![]() Finite State Machines are series of design patterns often used in Game Development. In this article I’ll define what they are & how they work, go over 3 example implementations I have implemented in Corona SDK, and describe some of the pain points I’ve encountered using them.
Finite State Machines are series of design patterns often used in Game Development. In this article I’ll define what they are & how they work, go over 3 example implementations I have implemented in Corona SDK, and describe some of the pain points I’ve encountered using them.
I’ve ported Cassio Souza’s ActionScript 3 State Machine to a Lua State Machine, and recently a Dart version, and included examples. This article has a companion video embedded below.
What Are State Machines
At their simplest form, State Machines are an Observer pattern with 2 values they watch internally: an Entity and the Current State. Whenever someone, somewhere changes the internal state, it’ll let the world know.
The high level parts are:
- States which contain/define the behavior for the Entity
- Transitions which occur when one State changes to another
- Rules which define which States can change to certain other States
- Events which are internally or externally dispatched which trigger State Transitions
When creating State Machines, you usually know all the states up front, hence the word finite. Whether a list on paper or a bunch of boxes on a flow chart with arrows denoting where you can go from where. Some states can have parent child relationships. There can be a variety of rules that allow/prevent some states from changing to others can causing state transitions.
Why Use State Machines
There are 3 use cases State Machines. These are Artificial Intelligence, modeling simulations, and a refactoring path for game entities.
For AI programming, you have the choice of deterministic or non-deterministic. Most video games have deterministic; meaning you know how the enemies will react based on different inputs. If they don’t see you, they’ll patrol. If they see you, they’ll attack you. If you hide and wait, they’ll eventually go back to patrolling. You can simulate fuzzy logic by using random numbers to change state to something random. For example, sometimes the enemy could use a grenade vs. a gun, or attack you immediately vs. sounding the alarm… or even run away to get reinforcements. Sometimes they could even talk to you instead. This randomness makes a State Machine non-deterministic, meaning you know all the States, but you don’t know exactly all the paths between States.
For modeling simulations, whether complex machinery, or situations, you often have a ton of moving parts. You’re interested in the potential interactions when certain things are in certain states. Sometimes you want these situations to be repeatable.
For example, for simulating hardware of large steel manufacturing machinery for training purposes, you want to setup the machine either in a specific state, or towards one to teach a new operator how to handle a certain negative situation in a safe environment to learn. You start a predefined set of actions to get the machine in a state where something bad is about to happen, and the operator has to learn how to push the right buttons or turn the right knobs to stop things from going bad.
You can do the same at a macro level for emulating events. Think SimCity.
This is also why unit testing deterministic state machines is pretty easy, albeit not as fun as non-deterministic, because you know all the paths ahead of time and the potential interactions.
For the purpose of this article, we’re concerned with refactoring paths for game entities. Specifically, “dude, this code is too complex to manage and there are 50 billion boolean flags/if then statements to deal with…”. Using State Machines makes your code more manageable as it grows, more organized, and easier to debug.
Behavior in a Class vs. Behavior in States
Alan Skorkin has a great article on why developers often don’t use state machines. While he’s referring to software development as a whole, not just game development, he brings up a lot of valid points. Specifically, YAGNI, or if you don’t know ahead of time you’ll have a lot of behavior, you start out building only what you need. The issue becomes down the line, the effort towards refactoring it to a proper state machine is a lot of work.
I experienced this from 2 angles. The first is what got me interested in state machines in the first place. My game entities were getting uber complex, and I asked around for advice. Colleagues recommended Finite State Machines to solve all my problems. During the refactoring, I started to learn why they’re great for lots of behavior in known states.
I then tried implementing one in a brand new code base with only a little behavior… and it was overly complex. Then I reached this mid-point where the complexity was hard to manage, but I didn’t want to go back to a State Machine again.
So I’ve had a frustrating experience and an extremely positive one.
You can see a before and after example of how State Machines can really make your game entity classes smaller and more manageable as their behavior grows.
Example 1: Simple State – Event Handler
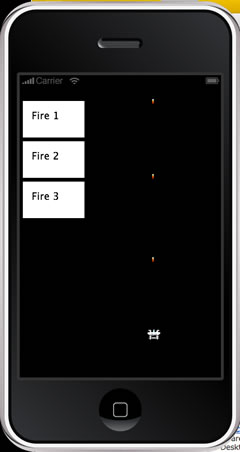
Let’s show a simple 1942 ‘esque example in Lua. You have an overhead view of an airplane that has 3 firing modes: a single bullet, faster dual-bullets, and a 3 pronged super-fast bullet mode.
From our state flow chart below, you can see we have 3 states, with Fire 1 being the initial state. The events between states are when the plane touches a power up. If the plane hits an enemy, they’ll go back a state, from Fire 3 to Fire 2 and from Fire 2 to Fire 1.

Now let’s setup our State Machine:
fireFSM = StateMachine:new()
fireFSM:addState("fire1", {from="*"})
fireFSM:addState("fire2", {from="*"})
fireFSM:addState("fire3", {from="*"})
fireFSM:setInitialState("fire3")
fireFSM:addEventListener("onStateMachineStateChanged", onChangePlayerFireFunction)
Whenever anyone changes the fireFSM, it’ll dispatch the “onStateMachineStateChanged” event. We can then set the Entity’s proper fire function as well as the speed at which it should fire at in milliseconds.
function onChangePlayerFireFunction(event)
   local fireFunkyFunk
   local state = fireFSM.state
   local fireSpeed
   if state == "fire1" then
      fireFunkyFunk = player.fire1
      fireSpeed = 300
   elseif state == "fire2" then
      fireFunkyFunk = player.fire2
      fireSpeed = 200
   elseif state == "fire3" then
      fireFunkyFunk = player.fire3
      fireSpeed = 150
   end
   player.fire = fireFunkyFunk
   player.FIRE_TIME = fireSpeed
end
Notice we inspect what the new state is at line 69. From there it’s just a simple switch statement to determine which firing mode to switch to. Notice we actually set the data on the Entity itself, in this case “player”. The player then uses this data in his game tick (slang for a function that fires when the Game Loop decides it’s time for your game object to do something). Like so:
function player:tick(millisecondsPassed)
   if self.firing == true then
      self.startFireTime = self.startFireTime + millisecondsPassed
      if self.startFireTime >= self.FIRE_TIME then
         self.startFireTime = 0
         self:fire()
      end
   end
Notice line 144. The player/plane doesn’t know what fire actually is, it just executes it every time it’s allowed to fire. If you change it to a different fire function, it’ll use that one. Let’s take a look at those. Here’s fire1, which fires a single bullet every 300 milliseconds:
function player:fire1()
   local bullet = getBasicBullet("player_bullet_1.png", self.x + self.width / 2, self.y)
end
In game, it’ll look like this:
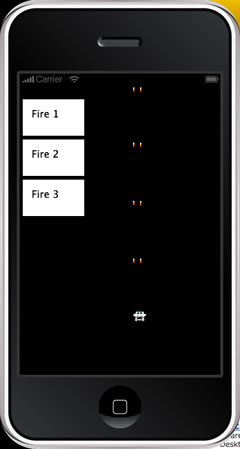
If we press the Fire 2 button (which simulates getting a power up), it’ll change the Entity’s fire reference to the fire2 function:
function player:fire2()
   local bullet = getBasicBullet("player_bullet_2.png", self.x, self.y)
   bullet.x = bullet.x + bullet.width / 2
end
The only difference here is a different image which is larger, and we center it on the player.
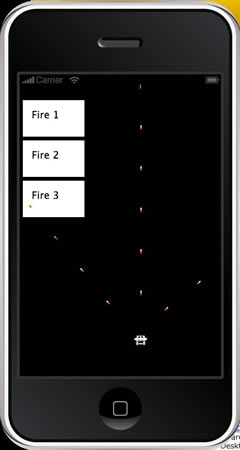
Finally, if we hit the Fire 3 button, it’ll change it to the fire3 function.
function player:fire3()
   local bullet1 = getBasicBullet("player_bullet_1.png", self.x, self.y)
   bullet1.rotation = -45
   bullet1.rot = math.atan2(bullet1.y -  -800,  bullet1.x - -800) / math.pi * 180 -90;
   bullet1.angle = (bullet1.rot -90) * math.pi / 180;

   local bullet2 = getBasicBullet("player_bullet_1.png", self.x, self.y)
   bullet2.rotation = 45
   bullet2.rot = math.atan2(bullet2.y -  -800,  bullet2.x - -800) / math.pi * 180 -90;
   bullet2.angle = (bullet2.rot) * math.pi / 180;

   -- override the functions with these instead
   function bullet1:tick(millisecondsPassed)
      self.x = self.x + math.cos(self.angle) * self.speed * millisecondsPassed
         self.y = self.y + math.sin(self.angle) * self.speed * millisecondsPassed
   end

   function bullet2:tick(millisecondsPassed)
      self.x = self.x + math.cos(self.angle) * self.speed * millisecondsPassed
         self.y = self.y + math.sin(self.angle) * self.speed * millisecondsPassed
   end

   local bullet3 = getBasicBullet("player_bullet_1.png", self.x + self.width / 2, self.y)
end
Which looks like:
Again, the sequence of events for hitting the Fire 2 button are:
- fireFSM:setInitialState(“fire1”) puts the State Machine in the initial fire 1 state.
- When you press the Fire 2 button, it’ll call fireFSM:changeState(“fire2”)
- The State Machine internally will dispatch the change event “onStateMachineStateChanged”
- In our event handler for it, we’ll inspect what the new state is, and assign the appropriate fire function.
Example 1: Simple State – Event Handlers
While using a change event is simple and results in 1 function, what if you have a lot of states? This is where using enter/exit handlers helps you organize your code more and it scales better. Taking our exact same example above, instead of using our onChangePlayerFireFunction to listen for the State Machine’s “onStateMachineStateChanged” event:
fireFSM:addEventListener("onStateMachineStateChanged", onChangePlayerFireFunction)
We’ll instead use an enter handler instead, like so:
fireFSM:addState("fire1", {from="*", enter=onEnterStateFire1})
fireFSM:addState("fire2", {from="*", enter=onEnterStateFire2})
fireFSM:addState("fire3", {from="*", enter=onEnterStateFire3})
Now, this results in 3 organized functions that are a lot smaller and easier to read. It’s also obvious what they do based on the naming convention:
function onEnterStateFire1(event)
   player.fire = player.fire1
   player.FIRE_TIME = 300
end

function onEnterStateFire2(event)
   player.fire = player.fire2
   player.FIRE_TIME = 200
end

function onEnterStateFire3(event)
   player.fire = player.fire3
   player.FIRE_TIME = 150
end
Example 2: Hierarchical State Machine
There are a variety of benefits using a hierarchical State Machine; a State Machine where States have parent child relationships.
First, it helps DRY your code. There are a lot of things some states have in common so you can run that initialization code once. Same goes for destroy/clean up code.
Secondly, it helps you organize your code; ie “Attacking code goes in this section whereas Defending code goes over here”.
Third, a State Machine can help you enforce paths to go from child to parent to sibling to child. Just like in Starcraft, a Siege Tank must first transform to assault mode from the siege mode before it can actually move and fire again.

The State Machine will throw errors if you attempt to move to an illegal path which helps you correct your code. It will also showcase missing transitions if you forgot one. Why are paths important? Just like we can’t go from Siege Mode to Move Mode using a Starcraft Siege tank, we don’t want our War Robot in Example 2 going from Artillery Mode to Move Mode. There is some time it takes to get setup for long range artillery strikes, as well as getting out of artillery mode. Our example does NOT enforce this but gives you the mechanisms to do so to ensure the player cannot do anything whilst transitioning from one State to the next.
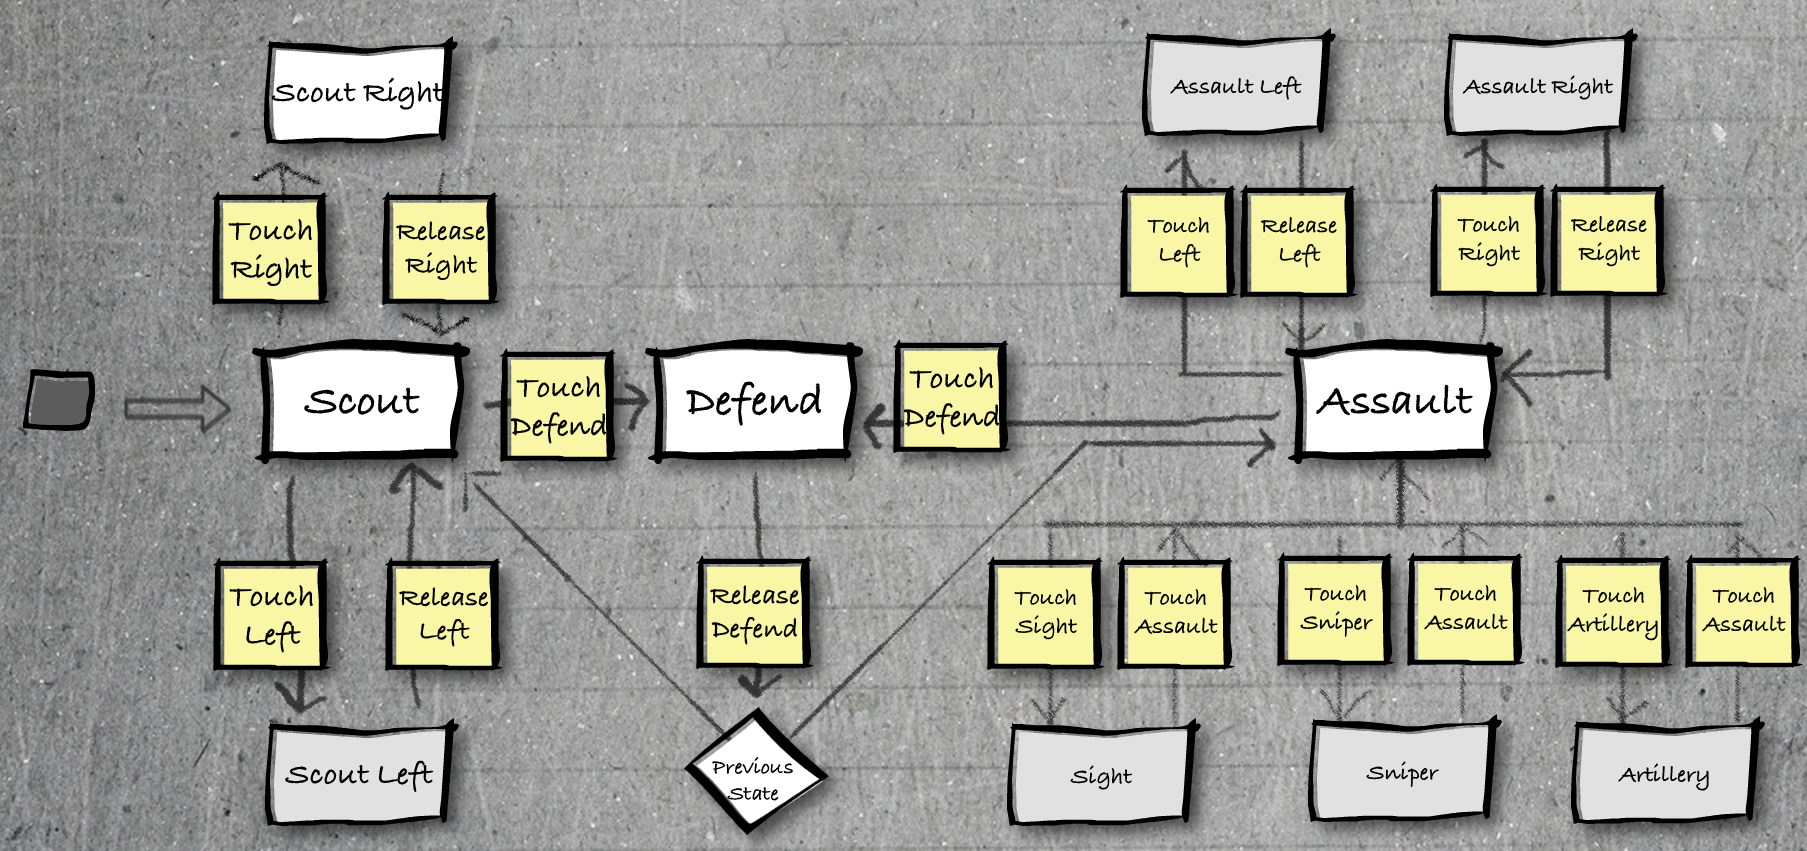
Here’s the flow chart for Example 2, where our War Robot can be an upright walking robot for recon, a defense mode for holding up shields to protect itself, and an assault mode with 3 firing modes: laser sight, sniper, and artillery (click for larger version).
We’ll set up our State Machine much like before in Example 1, except here we’ll use a new parameter called “parent” like so:
botFSM:addState("scout", {from={"defend", "assault"}, enter=onEnterScout})
botFSM:addState("scoutLeft", {parent="scout", from="scoutRight", enter=onEnterScoutLeft, exit=onExitScoutLeft})
botFSM:addState("scoutRight", {parent="scout", from="scoutLeft", enter=onEnterScoutRight, exit=onExitScoutRight})

botFSM:addState("defend", {from={"scout", "assault"}, enter=onEnterDefendState, exit=onExitDefendState})

botFSM:addState("assault", {from={"scout", "defend"}, enter=onEnterAssaultState, exit=onExitAsstaultState})
botFSM:addState("assaultLeft", {parent="assault", from="assaultRight", enter=onEnterAssaultLeft, exit=onExitAssaultLeft})
botFSM:addState("assaultRight", {parent="assault", from="assaultLeft", enter=onEnterAssaultRight, exit=onExitAssaultRight})
botFSM:addState("sight", {parent="assault", from={"sniper", "artillery"}, enter=onEnterSightState, exit=onExitSightState})
botFSM:addState("sniper", {parent="assault", from={"sight", "artillery"}, enter=onEnterSniperState, exit=onExitSniperState})
botFSM:addState("artillery", {parent="assault", from={"sniper", "sight"}, enter=onEnterArtilleryState, exit=onExitArtilleryState})

botFSM:setInitialState("scout")
Notice our 3 main States (Scout, Defend, and Assault) clearly define which states they are allowed to be transitioned to via the from parameter. Also notice some special things about the parent parameter. The “scoutLeft” State, a child of “scout”, does not have to define its parent in the from parameter. It’s implied in the State Machine that a child state is allowed to be transitioned to by its parent. Finally, notice the use of exit to define exit handlers.
All this setup defines our states, their children, and who’s allowed to transition to whom. All of this matches our flow chart.
Our Entity, the WarBot class, is handling all the actual animations and storing the data and handling how the behavior works. What behavior it does, and when, is controlled by the State enter and exit functions. The how is affected by its internal variables, also changed by the State changes.
Let’s take a look at what happens when you enter the parent “scout” State by pressing the “Scout” button:
function onEnterScout()
   warBot:showSprite("scout")
   warBot:setSpeed(4)
end
It shows the scout sprite sheet and sets the speed to 4. If you press the “Scout Right” button, it’ll botFSM:changeState(“scountRight”) and call:
function onEnterScoutRight()
   warBot:showSprite("scoutRight")
   warBot:setDirection("right")
   warBot:startMoving()
end
This shows the scoutRight sprite sheet which is an animation of the robot running right. It also ensures it is facing the right direction and informs it needs to start animating. If you let go/stop touching the “Scout Right” button, it’ll go back to the parent “scout” state.
function onExitScoutRight()
   warBot:showSprite("scout")
   warBot:stopMoving()
end
Notice that this does NOT fire an onExitScout function; you’re still technically in the scout state since scoutLeft and scoutRight are its children. It looks like so:
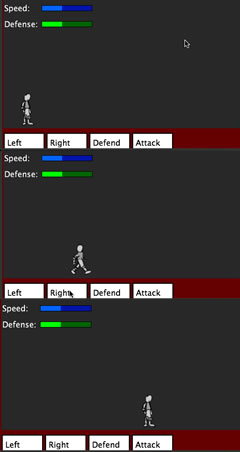
Let’s take a look at the Defense State. He’s unique in that he doesn’t care where you came from; as soon as you let go of the Defend button, it’ll go to whatever the previousState was. Also of note, he’ll set some initial defense and speed variables (speed to 0 because you can’t move while in Defend State):
function onEnterDefendState()
   warBot:showSprite("defend")
   warBot:setDefense(10)
   warBot:setSpeed(0)
end
Notice we didn’t define an onExitDefendState. It’s assumed whatever State you’re going to will handle setting the speed & defense to the appropriate values.
Finally, we’re offloading a lot of the actual details of firing bullets, laser sights, etc. onto the Entity. Notice how all 3 of the Assault’s child modes tell the Entity to start or stop showing these effects. The benefit is you don’t have to worry about checking boolean flags before you run them; you can be sure the State Machine will only start and stop each one at the appropriate time. … Usually, heh.
Here’s Sniper mode’s enter and exit:
function onEnterSniperState()
   warBot:showSprite("sniper")
   warBot:setSpeed(0)
   warBot:startSniperShooting()
end

function onExitSniperState()
   warBot:showSprite("sniperReverse")
   warBot:stopSniperShooting()
end
Standard stuff here; show the correct sprite sheet, set the speed to 0 when you enter, and telling the entity to start handling touch events as sniper shots. When it exits, it shows the revert animation, and stops handling touch events as sniper shots.
State Changes Observer & Path Enforcement
Remember, the State Machine will both enforce the state paths you put in from as well as dispatch an event. Since it’s an observer, others can listen to these State changes as well. The ButtonsController we have listens to the state changes and only shows the appropriate buttons that mach our flow chart rules.
We give the ButtonsController a reference to the State Machine:
buttons:setStateMachine(botFSM)
He’ll then add an event listener to it and initialize himself to the current state:
function buttons:setStateMachine(fsm)
   if self.stateMachine then
      self.stateMachine:removeEventListener("onStateMachineStateChanged", self)
   end
   self.stateMachine = fsm
   if fsm then
      fsm:addEventListener("onStateMachineStateChanged", self)
   end
   self:onStateMachineStateChanged()
end
Now, instead of checking a bunch of rules to ensure they match our flow chart, we instead just only show the buttons you’re allowed to press in certain states:
function buttons:onStateMachineStateChanged(event)
   local state = self.stateMachine.state
   self:hideAllButtons()
   if state == "scout" or state == "scoutLeft" or state == "scoutRight" then
      self.walkLeftButton.isVisible = true
      self.walkRightButton.isVisible = true
      self.defendButton.isVisible = true
      self.attackButton.isVisible = true
   elseif state == "defend" then
      self.defendButton.isVisible = true
   elseif state == "assault" then
      self.rollLeftButton.isVisible = true
      self.rollRightButton.isVisible = true
      self.defendButton.isVisible = true
      self.scoutButton.isVisible = true
      self.sightButton.isVisible = true
      self.sniperButton.isVisible = true
      self.artilleryButton.isVisible = true
   elseif state == "assaultLeft" or state == "assaultRight" then
      self.rollLeftButton.isVisible = true
      self.rollRightButton.isVisible = true
      self.scoutButton.isVisible = true
   elseif state == "sight" or state == "sniper" or state == "artillery" then
      self.attackButton.isVisible = true
   end
end
This makes your changing the State Machine really easy because you don’t have to put tests in there; you just react and change it to match the flow chart. Here’s how moveRight works; if you press the button, it sets it to moveRight, and when you let go, it goes back to scout:
function buttons:onMoveRight(event)
   if event.phase == "began" then
      self.stateMachine:changeState("scoutRight")
   elseif event.phase == "ended" or event.phase == "cancelled" then
      self.stateMachine:changeState("scout")
   end
end
Example 3: Class Based States
Last up is the class version of the State Machine examples. My version of Classes in Lua are just tables using closures for scope reasons.
The class approach has some advantages. First, as your code grows in size, it’s easier to scale. You can utilize inheritance and packages help keep it clean, organized, and DRY. This also makes code reuse slightly easier as well. In the first 2 examples, you can see how the actual behavior implementation is separate from the State Machine, in main.lua. It’s not really grouped together in any organized fashion.
The second advantage is, like the enter and exit functions, the class only handles that behavior in which it is responsible for. If you look in Example 2, you’ll notice the WarBot, although not determining his behavior, is still responsible for setting himself up internally for it. Using classes, you offload the majority of that code to the appropriate state responsible for it.
The third advantage is leveraging Corona’s event system. States can both react to events from the global event bus, Runtime, as well as dispatch their own in case other State Machines need to know about something. This allows a loose coupling for inter-State Machine communication.
Downsides are moar code which requires moar unit tests which in turn is moar code. This is moar complexity which can result in a lower iteration speed. Not always ideal for games. I like it, though, coming from an OOP background.
Let’s start with a really simple State Machine: a character that can move left, right, jump, and attack.
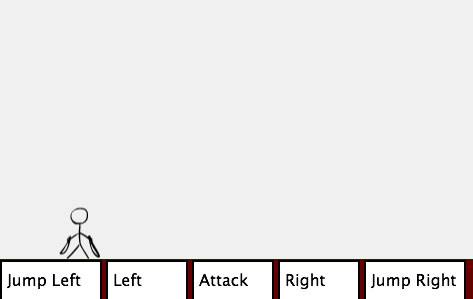
And here’s the flow chart with the State paths. Notice if the character sits still, he can rest. That’s it (click for larger image).
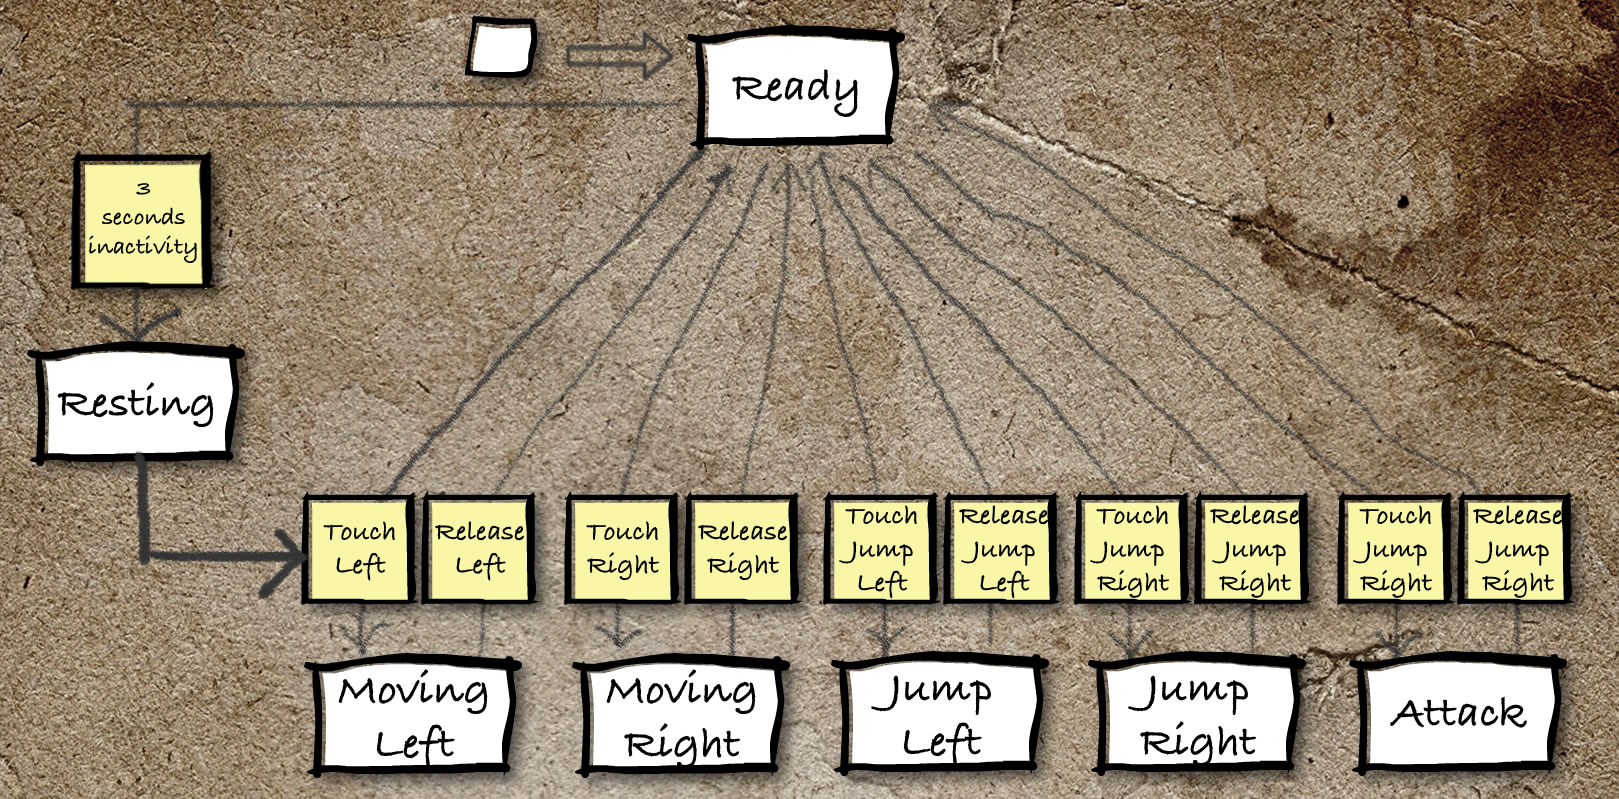
Setting up the State Machine is only slightly different; you use addState2, and put a class instance inside it, like so:
fsm:addState2(ReadyState:new())
fsm:addState2(RestingState:new())
fsm:addState2(MovingRightState:new())
fsm:addState2(MovingLeftState:new())
fsm:addState2(JumpLeftState:new())
fsm:addState2(JumpRightState:new())
fsm:addState2(AttackState:new())
fsm:setInitialState("ready")

gameLoop:addLoop(fsm)
Also note I added it to the Game Loop. I default all States to have a tick method so they can tap into the global Game Loop as well.
Pay special note to the setInitialState; it takes a String name. I used a convention to keep the the API the same: ReadyState becomes “ready”, MovingRightState becomes “movingRight”, etc. All classes use their name in the constructor so the State Machine knows what their name is.
In a State class, you just import the base class, extend it, and pass in your name.
require "com.jessewarden.statemachine.BaseState"
ReadyState = {}

function ReadyState:new()
   local state = BaseState:new("ready")
From there, you can do whatever you wish. The standard methods to implement are onEnterState, onExitState, and tick. All State class have references to the Entity they are dealing with as well as the State Machine they are within as illustrated in the tick function getting local references to it:
function state:onEnterState(event)
end

function state:onExitState(event)
end

function state:tick(time)
   local player = self.entity
   local stateMachine = self.stateMachine
end
Let’s take a look at the ReadyState’s onEnterState function. He states the Entity is not recharging his stamina, resets the internal rest timer (since you have to sit still for 3 seconds to trigger a State transition to the RestingState), and listens for global events that can trigger other, valid State transitions.
function state:onEnterState(event)
   local player = self.entity
   self.recharge = false

   self:reset()

   player:showSprite("stand")

   Runtime:addEventListener("onMoveLeftStarted", self)
   Runtime:addEventListener("onMoveRightStarted", self)
   Runtime:addEventListener("onAttackStarted", self)
   Runtime:addEventListener("onJumpLeftStarted", self)
   Runtime:addEventListener("onJumpRightStarted", self)
end
That last part is the key. I don’t care where these events come from, I just know, if someone, somewhere says that onMoveLeftStarted, then this State class will react and say, “Ok, go ahead and change the state to the moveLeft state then.”:
function state:onMoveLeftStarted(event)
   self.stateMachine:changeStateToAtNextTick("movingLeft")
end
Notice here there are no rules enforcement. They’re entirely up to you in an opt-in way. If you do not handle, or allow a State transition here, none occurs. It’s up to your class to opt in and allow State transitions. Conversely, you can have someone else with a reference to the State Machine to actually change the states; up to you. The downside here is no help from the State Machine to see if your States actually match what’s in your flow chart. I’ve thought about adding a way to declaratively add them just like you did in Example 1 and 2.
The JumpLeftState shows the power of inheritance at work:
require "states.JumpState"

JumpLeftState = {}

function JumpLeftState:new()
   local state = JumpState:new("jumpLeft")

   state.superOnEnterState = state.onEnterState
   function state:onEnterState(event)
      self:superOnEnterState(event)

      local player = self.entity
      player:setDirection("left")
   end

   state.superOnExitState = state.onExitState
   function state:onExitState(event)
      local player = self.entity
      player:applyLinearImpulse(-player.jumpForwardForce / 3, 0, 40, 32)
      self:superOnExitState(event)
   end

   state.superTick = state.tick
   function state:tick(time)
      local player = self.entity
      player.x = player.x + -(player.jumpForwardForce)
      self:superTick(time)
   end

   return state

end

return JumpLeftState
He extends the base JumpState, allowing it to do most of the heavy lifting dealing with Box2D + Game Loop movement timing, etc. This State just sets the direction to the correct way. Notice too a rudimentary super method call to allow the base class to do it’s work first. I also extend the jump behavior by also moving the Entity in the right direction. I could let the base class do this, or the sub-class… up to you.
Be aware in all examples, the State classes have their onEnterState and onExitState methods called in the correct order, always. You do NOT have to implement them if you do not wish to. Finally, the most important thing to notice is the State classes use the changeStateToAtNextTick method for the State Machine class vs. changeState. The short reason for this is that it allows all the code in the current stack to run, including State machine class clean up, as well as avoiding common race conditions (if you’re a Flash Developer, think invalidation).
Real World Challenges
I wanted to show you some of the challenges I’ve had in the real world. While the design patterns’ rules are quite clear about “Entity’s holding the data, States implementing the behavior” sometimes it’s easier to let the Entity handle the details… especially with Box2D collisions.
An example of this is in my ZombieStick game where a Zombie grapples with the player. They get a reference to the player they grappled, add themselves as a grappler, and await the Player’s State Machine to resolve fighting off the zombie. Off-loading a lot of this code to the Entity makes them much cleaner classes, and results in less code since the Entity’s already extend a Corona DisplayObject. To pragmatists, sounds legit, to ivory tower purists, it’s pathetic… especially in a light weight and powerfully dynamic language like Lua.
This works out ok in that if a collision event fires from a Zombie, but if he’s in another state where he clearly can’t grapple the player (prone, stunned, dead), he just ignores the event. Sounds great at first, but Corona collision events are just that… events, once you miss them, they’re gone. Therefore, each State class has the burden of in its onEnterState to do some checking to see what it missed. This is basically the same problem PureMVC and Robotlegs Mediators solve in application development (data is ready, you’re not vs. you’re ready, data is not), so you can do the same here as well; you just have to ensure your Entity does a good job of exposing the variables you need to have your State boot up correctly.
For example, here’s the Zombie’s Box2D collision handler:
function zombie:collision(event)
   if self.dead == true then return true end
   if event.phase == "began" then
      if event.other.classType == "PlayerJXL" then
         if self.collisionTargets == nil then
            self.collisionTargets = {}
         end
         if table.indexOf(event.other) == nil then
            table.insert(self.collisionTargets, event.other)
         end
      end
   elseif event.phase == "ended" then
      if event.other.classType == "PlayerJXL" then
         table.remove(self.collisionTargets, table.indexOf(event.other))
         if self.targetPlayer ~= nil and event.other == self.targetPlayer then
            self:dispatchEvent({name="onTargetPlayerRemoved", target=self})
         end
      end
   end
end
All it basically does is manage an internal list of things it hit that are players. If the player moves away, great, it removes them. This allows the State classes to manage whether or not the Zombie should actually act on grappling a player not; ie the actual behavior. As soon as the State boots up, it checks this collisionTargets array in the onEnterSate function. Any time thereafter, it’ll get the proper events, thus avoiding race conditions. Additionally, the State classes can do it whenever they wish; ie whenever the State Machine moves to the IdleState, that’s the first thing he checks:
function state:handleCollisionTargets()
   local zombie = self.entity
   local targets = zombie.collisionTargets
   if targets ~= nil and #targets > 0 then
      local first = targets[1]
      zombie.targetPlayer = first
      self.stateMachine:changeStateToAtNextTick("grabPlayer")
   end
end
Again, following a common solution used in other languages and frameworks… but just 1 more thing for you to remember, and moar code. I agree with it, and you DO get in a groove, just something to be aware of.
The other thing I noticed is that 90% of the State Machine being changed to different States is handled in the State classes themselves. However, you get into these edge cases where you need someone ELSE to change it. The example I just gave, when the Zombie grapples onto the player, the Player needs to immediately react. Using the above example, it’d be better to just have the States that are capable of legally going to Grappled Defense State handling it, right? Well… no. If a Zombie grabs you, you drop what you’re doing and react… even if you’re in the middle of the air in a Jump State. Here’s a method in the Base Player class (the Entity itself) that does just that:
function player:addGrappler(dudeGrabbingMeUpInThisMug)
   -- TODO: need to ensure you can actually be grappled, need to check state. psuedo code below
   local currentState = self.fsm.state
   if currentState == "firehose" and currentState == "grapple" and currentState == "jump" and current == "jumpLeft" and currentState == "jumpRight" then
      error("Illlegal to grapple player when they're in state: ", currentState)
   end

   -- if you're grappled, you're slowed down
   local grapplers = self.grapplers
   if table.indexOf(grapplers, dudeGrabbingMeUpInThisMug) == nil then
      table.insert(grapplers, dudeGrabbingMeUpInThisMug)
      self:resolveSpeed()
      self.fsm:changeStateToAtNextTick("grappleDefense")
      return true
   else
      error("grappler already added to array")
   end
end
Yes, a code smell… further evidence that rules enforcement would mitigate this problem. So would a flow chart indicating what states a Zombie can actually grapple me in. Anyway, if you see things like this in your implementation, hopefully you now know how to solve or refactor them.
Conclusions
Again, the high level characteristics of a State Machine are:
- States which contain/define the behavior for the Entity
- Transitions which occur when one State changes to another
- Rules which define which States can change to certain other States
- Events which are internally or externally dispatched which trigger State Transitions
Using State Machines allows you to more easily scale and organize behavior code for your Game Entities, especially for AI development. The rules engine helps ensure your code matches your flowchart, and tells you at runtime if it does not (except for Classes… working on it). You can set the StateMachine’s new state anywhere, and he’ll both dispatch a change event as well as call your enter/exit functions for you. If you wish for it to utilize the global Event bus, I’ve included instructions inside of the class on how to enable this. For larger projects, the class based option helps your code scale for larger projects. All of the examples are included in the Github repo where you can download the code.
Further reading:
- Finite State Machines
- Cogs framework with presentation (scroll down)
- Johnathan Kaye’s ActionScript 3 State Engine
- Richard Lord’s “Finite State Machines for AI in ActionScript
- Why Developers Never Use State Machines
Also posted on iOS Gaming.
Comments
6 responses to “Finite State Machines in Game Development”
Long live state machines!
I must say I really like Neil Manuel’s AS3 fsm. But it could be have a steep curve to start out with fsm’s.
Would you care to take a look at my JavaScript implementation of a finite state machine? I’m always interested in improving it. At first glance it’s quite different from your Lua implementation which reminds me a lot of Cassiozen’s AS3 FSM
I just wish to say thanks to you, for this awesome video. It definitely cleared up all mess in my head about FSMs and their use :)
[…] global event bus if you wish. Finally, it’s Router allows you to marry your application as a state machine against the browsers’ URL bar to support both deep linking, back/forward navigation, and […]
Supra! Excellent! Fantastic implementation of FSM in Corona!
“You can simulate fuzzy logic by using random numbers to change state to something random.”
Actually, that is a “stochastic” machine. Fuzzy automata can reside in multiple states at the same time, and to varying degrees. See, for example, “Mathematical Methods for Artificial Intelligence and Autonomous Systems”, by Dougherty and Giardina.
Fantastic article. Very helpful to me choosing how to approach the game I’m working on. I’m working with the Corona SDK as well so especially convenient that your examples are in Lua. Looking forward to investigating the code you’ve shared. Thank you :)